Teaching Manuscript: Lessons Learned From Quill-Cutting
Posted by Cait Coker
A couple of my colleagues recently embarked on a week-long venture of teaching the history of medieval manuscripts to high school students. Fingers crossed that I can get them to write a special blog post for us on that experience! I got to help them with prep work because they needed to cut a set of 25 quills for the students. I’m a print culture historian, so here are some of my notes and impressions just on the prep portion of this experience.
Pre-prep and purchasing
Kate Ozment has previously written on Teaching Manuscript: Writing with Quills, so I had an inkling (as it were) of what I would be getting myself into. In her blog post she describes finding an Etsy shop and purchasing pre-cured and cut quills, which is by far the most user-friendly and time-saving measure. If you can do that, do that.
We...didn’t do that. Mostly because our supplies were culled from a previously taught workshop. For this, some 150 pre-cured uncut quills had been purchased, and we had a little less than 50 that could be used for this separate endeavor, as well as a mix of partially used bottles of ink. We needed 25 cut quills for the class, with pens cut for both right-hand and left-hand users. (Historically, all scribes and scriveners would have been trained to write with their right hands. Today’s students aren’t, and we didn’t see any point in torturing people and making a needless mess for teenagers. In empirical bib terms, we call his “compromise.”) We guestimated, and prepared 21 quills cut for right-handed students and 4 for left-handed students, marking a red line on the lefties with a sharpie to separate them.
NB. If you’d like to try to make a quill totally from scratch, curing, cutting, and all, the good folks at How To Make Everything show off these processes in their “Book” episode.
It took a group of six of us around two hours to do all of the cutting—that was a rate of about four quills per person with half an hour of work per pen. There was definitely a learning curve, and we all improved as we went along, but if this is something you want to teach with your own students, definitely budget your time accordingly.
As I mentioned, we had a stock of uncut quills and one quill pen already purchased. You will notice if you look around the web that uncut quills are significantly cheaper than cut ones, with uncut, uncured running you around $2 or less a piece (example here), uncut and cured around $2-4 (example here), and cured and cut $5-15 (We recommend Scribalworkshop’s 2/$11 deal here).
Depending on your own purposes, you may or may not want to purchase a pen knife as well. (Another thing I didn’t realize: Quill-cutting is where “pen knives” come from! All my life I’ve had a pen knife handy, and only now do I really get where the name comes from.) These can be more difficult and more expensive to find, ranging in price from around $75-$100 each (examples here and here). Honestly, I recommend a standard X-Acto craft knife, which can run you about $4 for the knife and $4 for a pack of replacement blades.
Preparing your quills
So let’s look at a quick before and after picture to see what we’re getting into:
On the top you see my cured and uncut quill, and on the bottom my finished, cut, and used quill. Your first step is going to be to snap the tip of the feather off and strip most of the barbs off so that you have a clean grip. It’s not as romantic, but it is easier to write with.
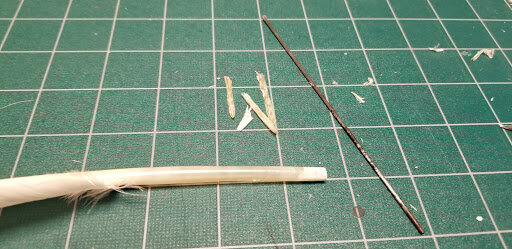
Next, you’re going to clear the membranes out of the hollow part of the feather’s shaft.
You’re going to want a long, thin piece of metal or wire for this. But look at how much stuff I got out: those fat bits of dried membrane and fluff! I was not expecting how much gunk would actually be in there. You’re going to want to get it all out as well, because you’re not just going to be cutting your nib for your day’s work, but preparing your pen for the rest of it’s working life, too. See, something I did not realize until I did it myself was that quill nibs naturally wear down as you use them, so you have to periodically pause and re-cut your nib to maintain a sharp writing instrument. This makes total sense and I honestly have no idea why I always thought you just ... kept using your one pen. I am also told that industrious medieval scribes could easily go through 20-50 pens a day, which just blows my mind.
Cutting your pen
Now we’re ready for the actual series of cuts to shape your nib. I highly recommend you use some combination of a previously cut pen and illustrated examples to show you how this is actually going to work. For example, Plate IV: Position of the Hand and Knife. Different Ways to Cut the Quill. Proportions of a Quill from Diderot’s Encyclopedie is a great graphic on the shapes you’re going to need to make:
You’ll also note that the illustration shows someone cutting the upright sfat with their quill pen. I am not at all sure if this is historical practice or not, but it kind of scared me, and so for better or worse I kept my pen flat on my cutting board the entire time. You’re also going to want to shape your pen so that the side where you’re cutting material away is the “back” of the pen; try holding it in your hand to get a sense of how you’d be writing with it comfortably, and then you can visualize where the point of your nib is actually going to go.
Your first cut is going to be the hardest. Honestly, until you get the hang of it, you’re probably going to make a few cuts. Notches really.
This was where the learning curve really kicked in. Four pens in I finally got to a point where my first cut would chop off a good chunk. Ideally the first one or two cuts will remove about an inche’s worth of the shaft, creating a hollow that you’ll start shaping with a series of finer, smaller cuts.
This looks ugly, and it’s going to need some work. Honestly, the hardest part is going to be keeping your patience and making yourself go slowly; if you start pushing too fast, or just have bad luck, it’s really easy to crack that cut shaft. If you do, you’re going to have to cut the whole thing off and start over again.
In this image I’m getting further along, but my work surface is messy. There was a group of us and only a couple of cutting mats, which was not great planning in retrospect. If you decide to do this as part of a teaching exercise, make sure that everyone has enough space to work and a suitable surface on which to do so.
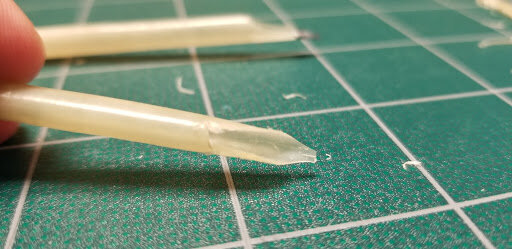
Your final series of cuts are going to be for shaping the tines, the slit, and the tip. The slit is going to be for the ink and how it will actually be drawn up into the pen, and the tip is going to determine the broadness of your strokes. I have a fairly broad nib here, suitable for medium and large strokes, because I was afraid if I made more fine cuts I’d screw up and have to start all over again. This pen looks a little ugly but it wrote fine; this is a lesson in functionality over form, sadly. But don’t worry, I plan on getting better!
This process was an experiment, and one that I expect we’ll end up fine-tuning over time. It’s really something where the balancing act of time and money can be an issue, and that’s something will want to look at more in going forward with this program. But at the end of the day, we had enough supplies and the students had a blast on the actual teaching days, so it was definitely worth it!
About the Author
Cait Coker is Associate Professor and Curator of Rare Books and Manuscripts at the University of Illinois Urbana-Champaign and will soon receive her doctoral degree in literature from Texas A&M University. Her current projects include journal articles on women's labor in the book trades in seventeenth-century England. She also frequently publishes on SFF and popular culture including editing the forthcoming collection The Global Vampire in Popular Culture. Contact her at: cait.coker (at) gmail (dot) com.
-
October 2022
- Oct 16, 2022 Teaching in the Maker Studio Part Two: Safety Training and Open Making
- Oct 16, 2022 Teaching Book Forms
- Oct 16, 2022 Teaching Letterpress with the Bookbeetle Press
-
September 2022
- Sep 24, 2022 Making a Scriptorium, or, Writing with Quills Part Two
- Sep 16, 2022 Teaching Cuneiform
- Sep 4, 2022 We're Back! Teaching Technologies of Writing
-
June 2020
- Jun 1, 2020 Black Lives Matter
- May 2020
-
April 2020
- Apr 1, 2020 Teaching Materiality with Virtual Instruction
- March 2020
-
February 2020
- Feb 1, 2020 Making the Syllabus Zine
-
January 2020
- Jan 1, 2020 Teaching Print History with Popular Culture
-
December 2019
- Dec 1, 2019 Teaching with Enumerative Bibliography
-
November 2019
- Nov 1, 2019 Finding Women in the Historical Record
-
October 2019
- Oct 1, 2019 Teaching in the Maker Studio
-
September 2019
- Sep 1, 2019 Graduate School: The MLS and the PhD
-
August 2019
- Aug 1, 2019 Research Trips: Workflow with Primary Documents
-
July 2019
- Jul 1, 2019 Research Trips: A Beginner's Guide
-
June 2019
- Jun 1, 2019 Building a Letterpress Reference Library
-
May 2019
- May 1, 2019 Teaching Manuscript: Writing with Quills
-
April 2019
- Apr 1, 2019 Why It Matters: Teaching Women Bibliographers
- March 2019
-
February 2019
- Feb 1, 2019 Roundup of Materials: Teaching Book History
-
January 2019
- Jan 1, 2019 Building and Displaying a Teaching Collection
-
December 2018
- Dec 1, 2018 Critical Making and Accessibility
-
November 2018
- Nov 1, 2018 Teaching Bibliographic Format
-
October 2018
- Oct 1, 2018 Teaching Book History Alongside Literary Theory
-
September 2018
- Sep 1, 2018 Teaching with Letterpress
-
August 2018
- Aug 1, 2018 Teaching Manuscript: Circulation
-
July 2018
- Jul 1, 2018 Setting Up a Print Shop
-
May 2018
- May 1, 2018 Teaching Manuscript: Commonplace Books
-
April 2018
- Apr 1, 2018 Getting a Press
-
March 2018
- Mar 1, 2018 Teaching Ephemera: Pamphlet Binding
- February 2018


